LIVESTREAM. WORKSHOP GUIDE
WARMEST WELCOME!
We are thrilled to have you join our dynamic team of movers, doers and healers who have discovered the power of their gift. The Club Livestream• is the space you’ve been looking for to facilitate and expand the reach of your impact. To breathe, sweat and grow with people across the globe.
Maybe you’ve known us since a while and have grown alongside us- maybe we’re relatively new to you. Either way we thought you might appreciate a proper introduction to the Salty story.
GETTING YOUR ENVIRONMENT READY
INTERNET: Make sure you are connected and have a stable Internet connection. To test your internet click here. The minimum for HD is 2.2 Mbps, recommended is 4.4 Mbps.
POWER: Make sure your computer is connected to a power source throughout the livestream.
TURN OFF DEVICES: Turn off notifications and any devices that you aren’t using to view the class. Also, turn off your laptop notifications (Whatsapp, Messenger, Slack or any other applications that might make sounds during the livestream). Only keep your phone to access your WhatsApp chat for questions.
SILENCE: Let your family or roommates know that you will be in session and ask if they can refrain from disturbing you for the duration.
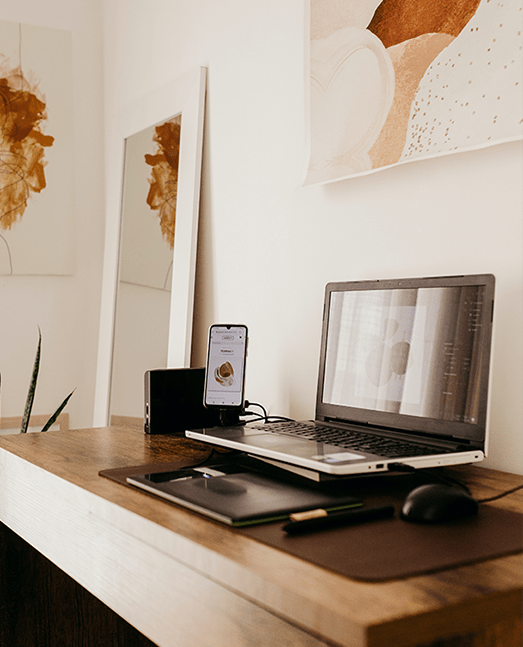
BACKGROUND: Have a proper space for a workshop: organized and decluttered background (avoid filming with a mirror or light behind you) that fits with the workshop.
FRAME THE SHOT: Make sure you fully fit in the frame.
LIGHTING: Natural light, like a window, or other light set-ups like a ring light. The light should be shining on you, not behind you.
SETTING UP ‘OBS STUDIO’
1.DOWNLOAD THE OBS STUDIO
- Go to https://obsproject.com and select download.
- Once you have downloaded and installed the OBS Studio, open the program.
- Get familiar with the OBS Studio program.
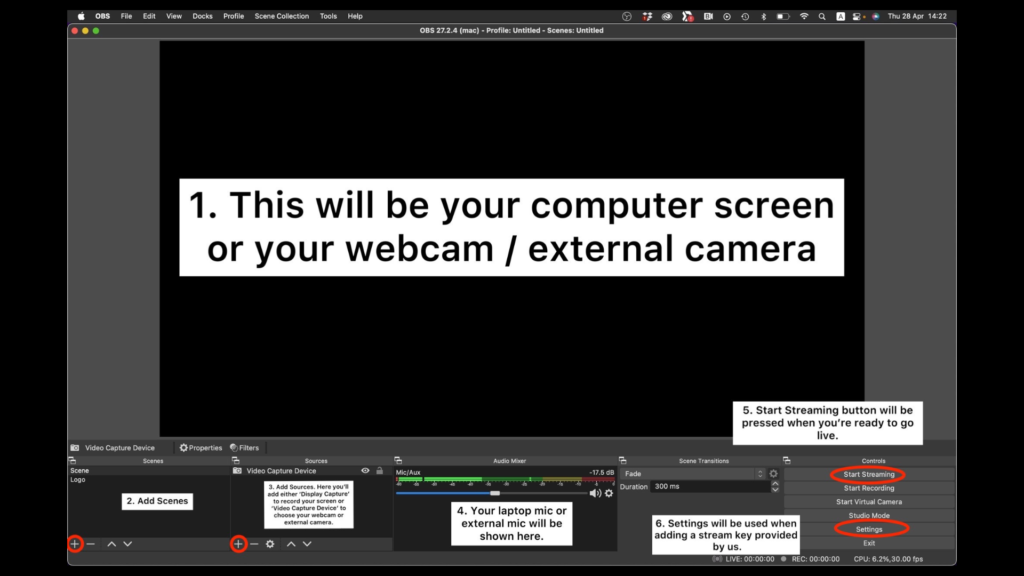
2.ADD YOUR SOURCES FOR VIDEO
OBS does not capture any video by default. To get started capturing, you need to add a source. At the bottom of the window is a box called ‘Sources‘.
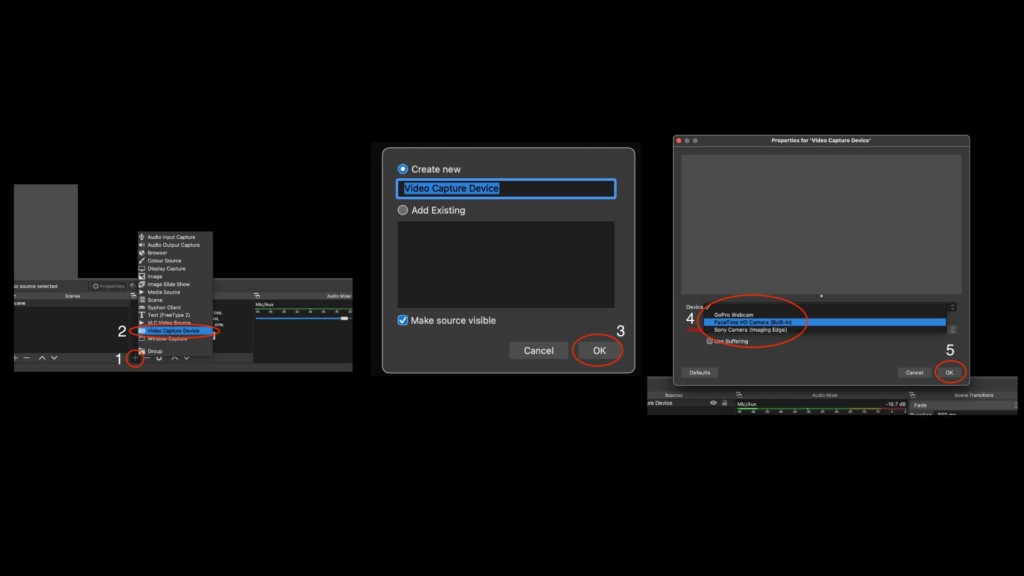
- Click on the + (or right click inside the Sources box)
- Pick the source you want:
- select Video Capture Device for a webcam or an external camera.
- select Display Capture to record everything visible on your computer screen.
- When you click Video Capture Device press OK.
- From a drop down menu choose what camera you will use:
- FaceTime HD (your computer webcam)
- Sony / GoPro external Camera.
- Press OK.
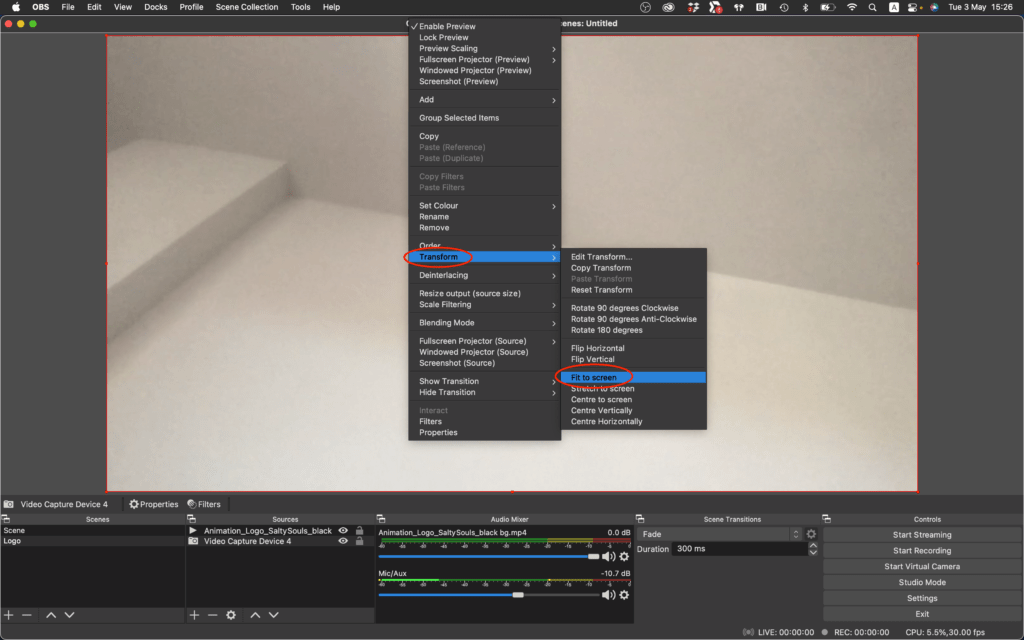
3. FIT TO SCREEN
Sometimes when you connect to the webcam or external camera you’ll show up zoomed in. In order to fit yourself into the screen, right-click on the main screen where you’re shown, and select TRANSFORM > FIT TO SCREEN.
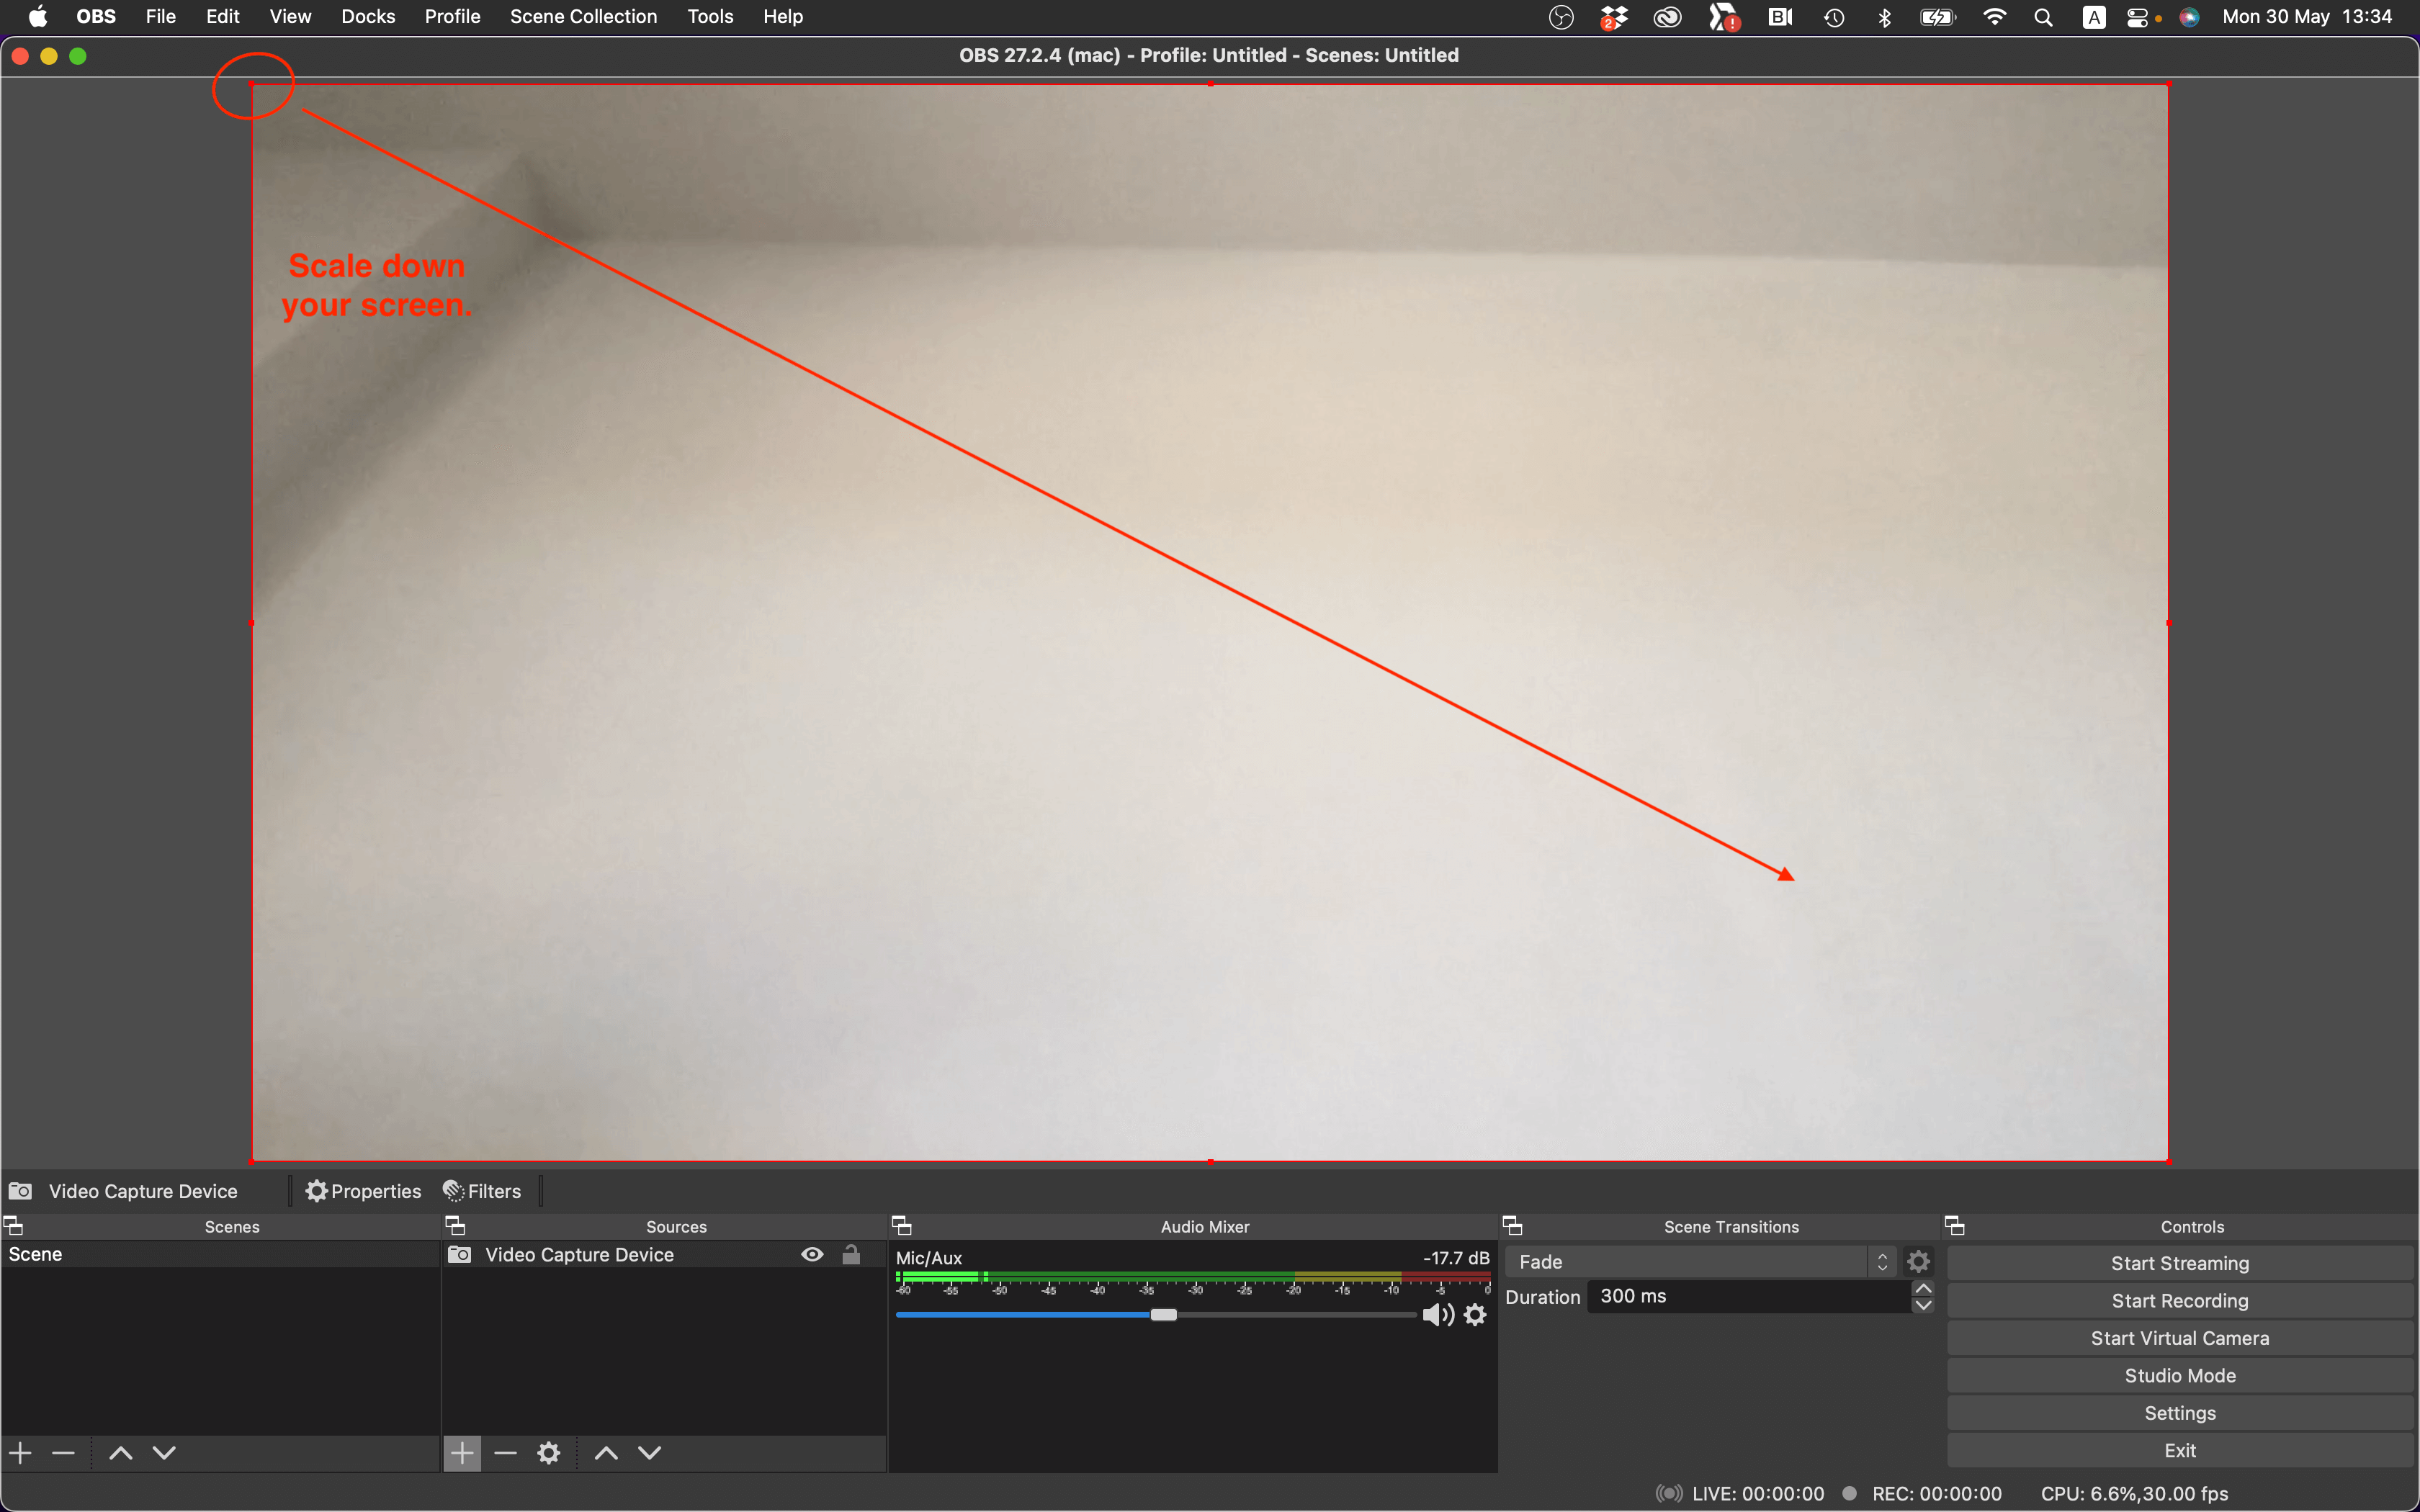
4. SCALE DOWN YOUR SCREEN
In order to have a split-screen where both – your webcam and laptop screen is visible, you need to scale down the webcam screen.
- Click on the edge of the top left corner of the screen and drag it to the bottom right corner until your webcam takes around 20% of your screen.
5. YOUR WEBCAM SCREEN SHOULD TAKE AROUND 20% OF YOUR SCREEN.
Make sure you scale down your webcam to around 20% of your screen.

6. ADD A NEW SOURCE ‘DISPLAY CAPTURE’ Now it’s time to add your monitor screen.
- Click + in the Sources section.
- Choose ‘DISPLAY CAPTURE‘ from a dropdown menu.

7. NAME YOUR DISPLAY CAPTURE
- Rename ‘Display Capture’ to ‘My screen’.
- Click ‘OK’.

8. FIT TO SCREEN YOUR MONITOR SCREEN
After adding a new ‘Display Capture’ source you’ll see a trippy window with your monitor screen and you need to scale it down to fit to screen. In order to do that, right-click on the main screen where your monitor is shown, and select TRANSFORM > FIT TO SCREEN.

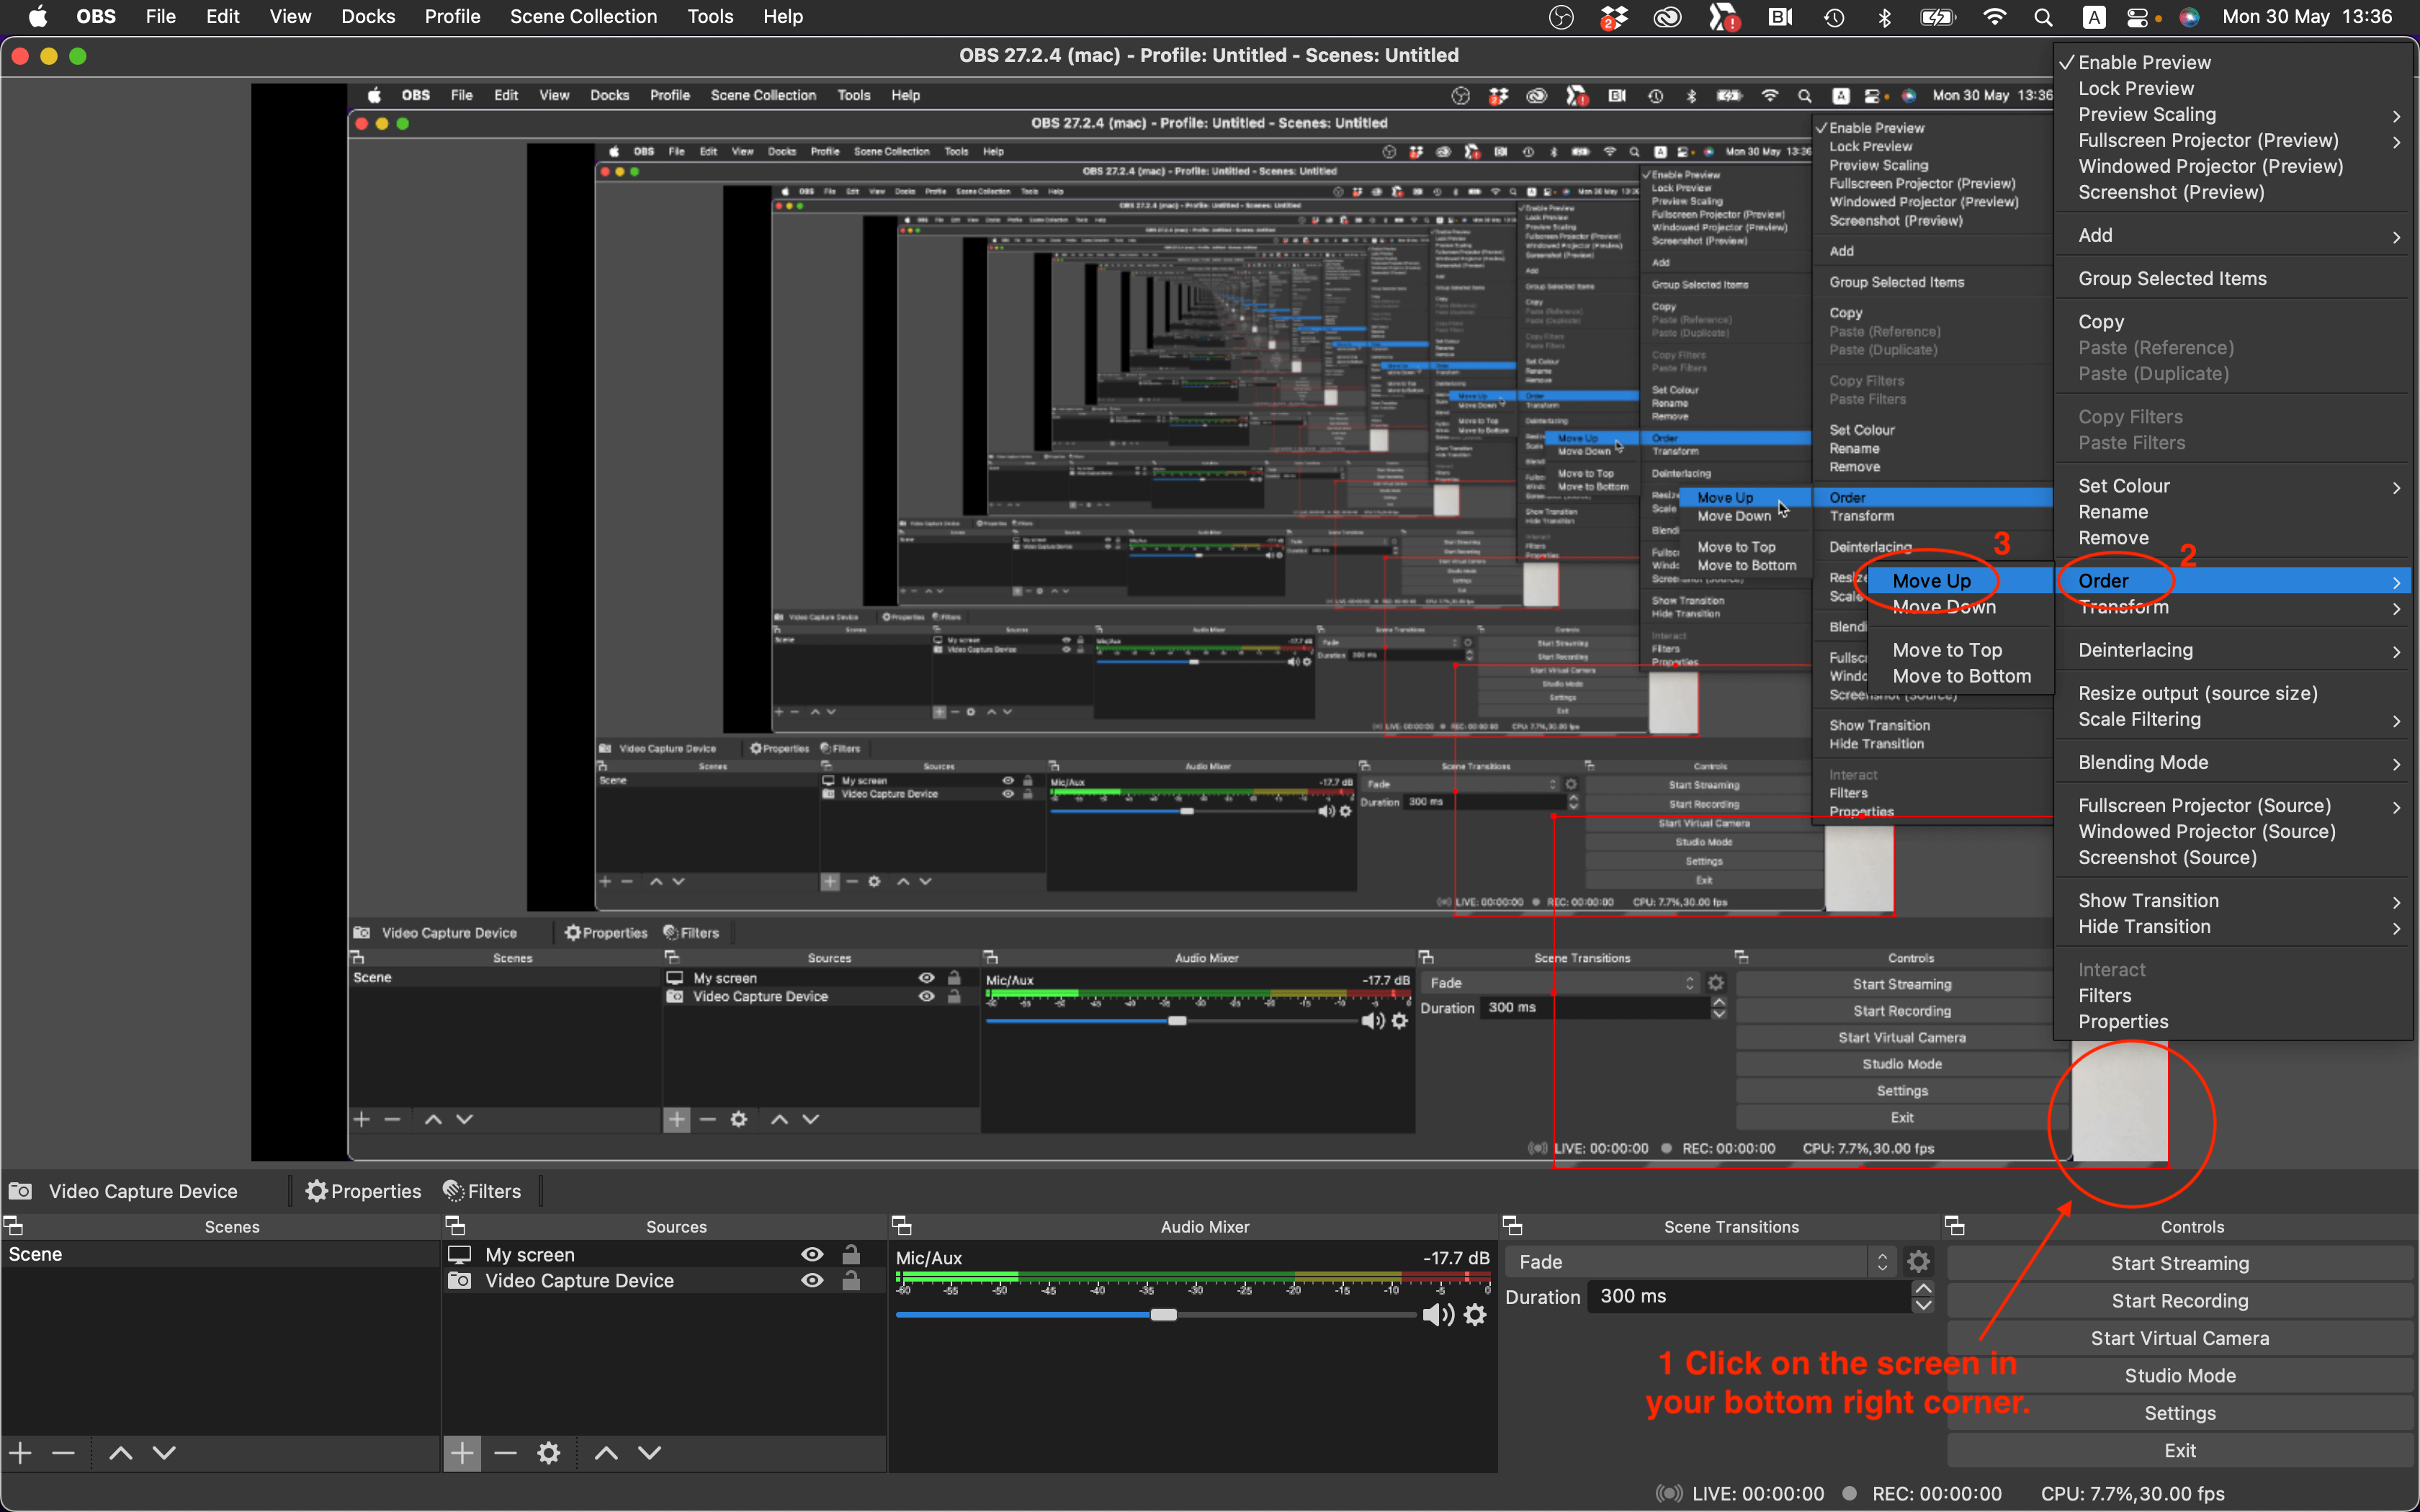
9. MOVE YOUR WEBCAM ABOVE YOUR MONITOR SCREEN
In the bottom right corner, you’ll see your webcam screen. Right-click on it and select ORDER > MOVE UP.
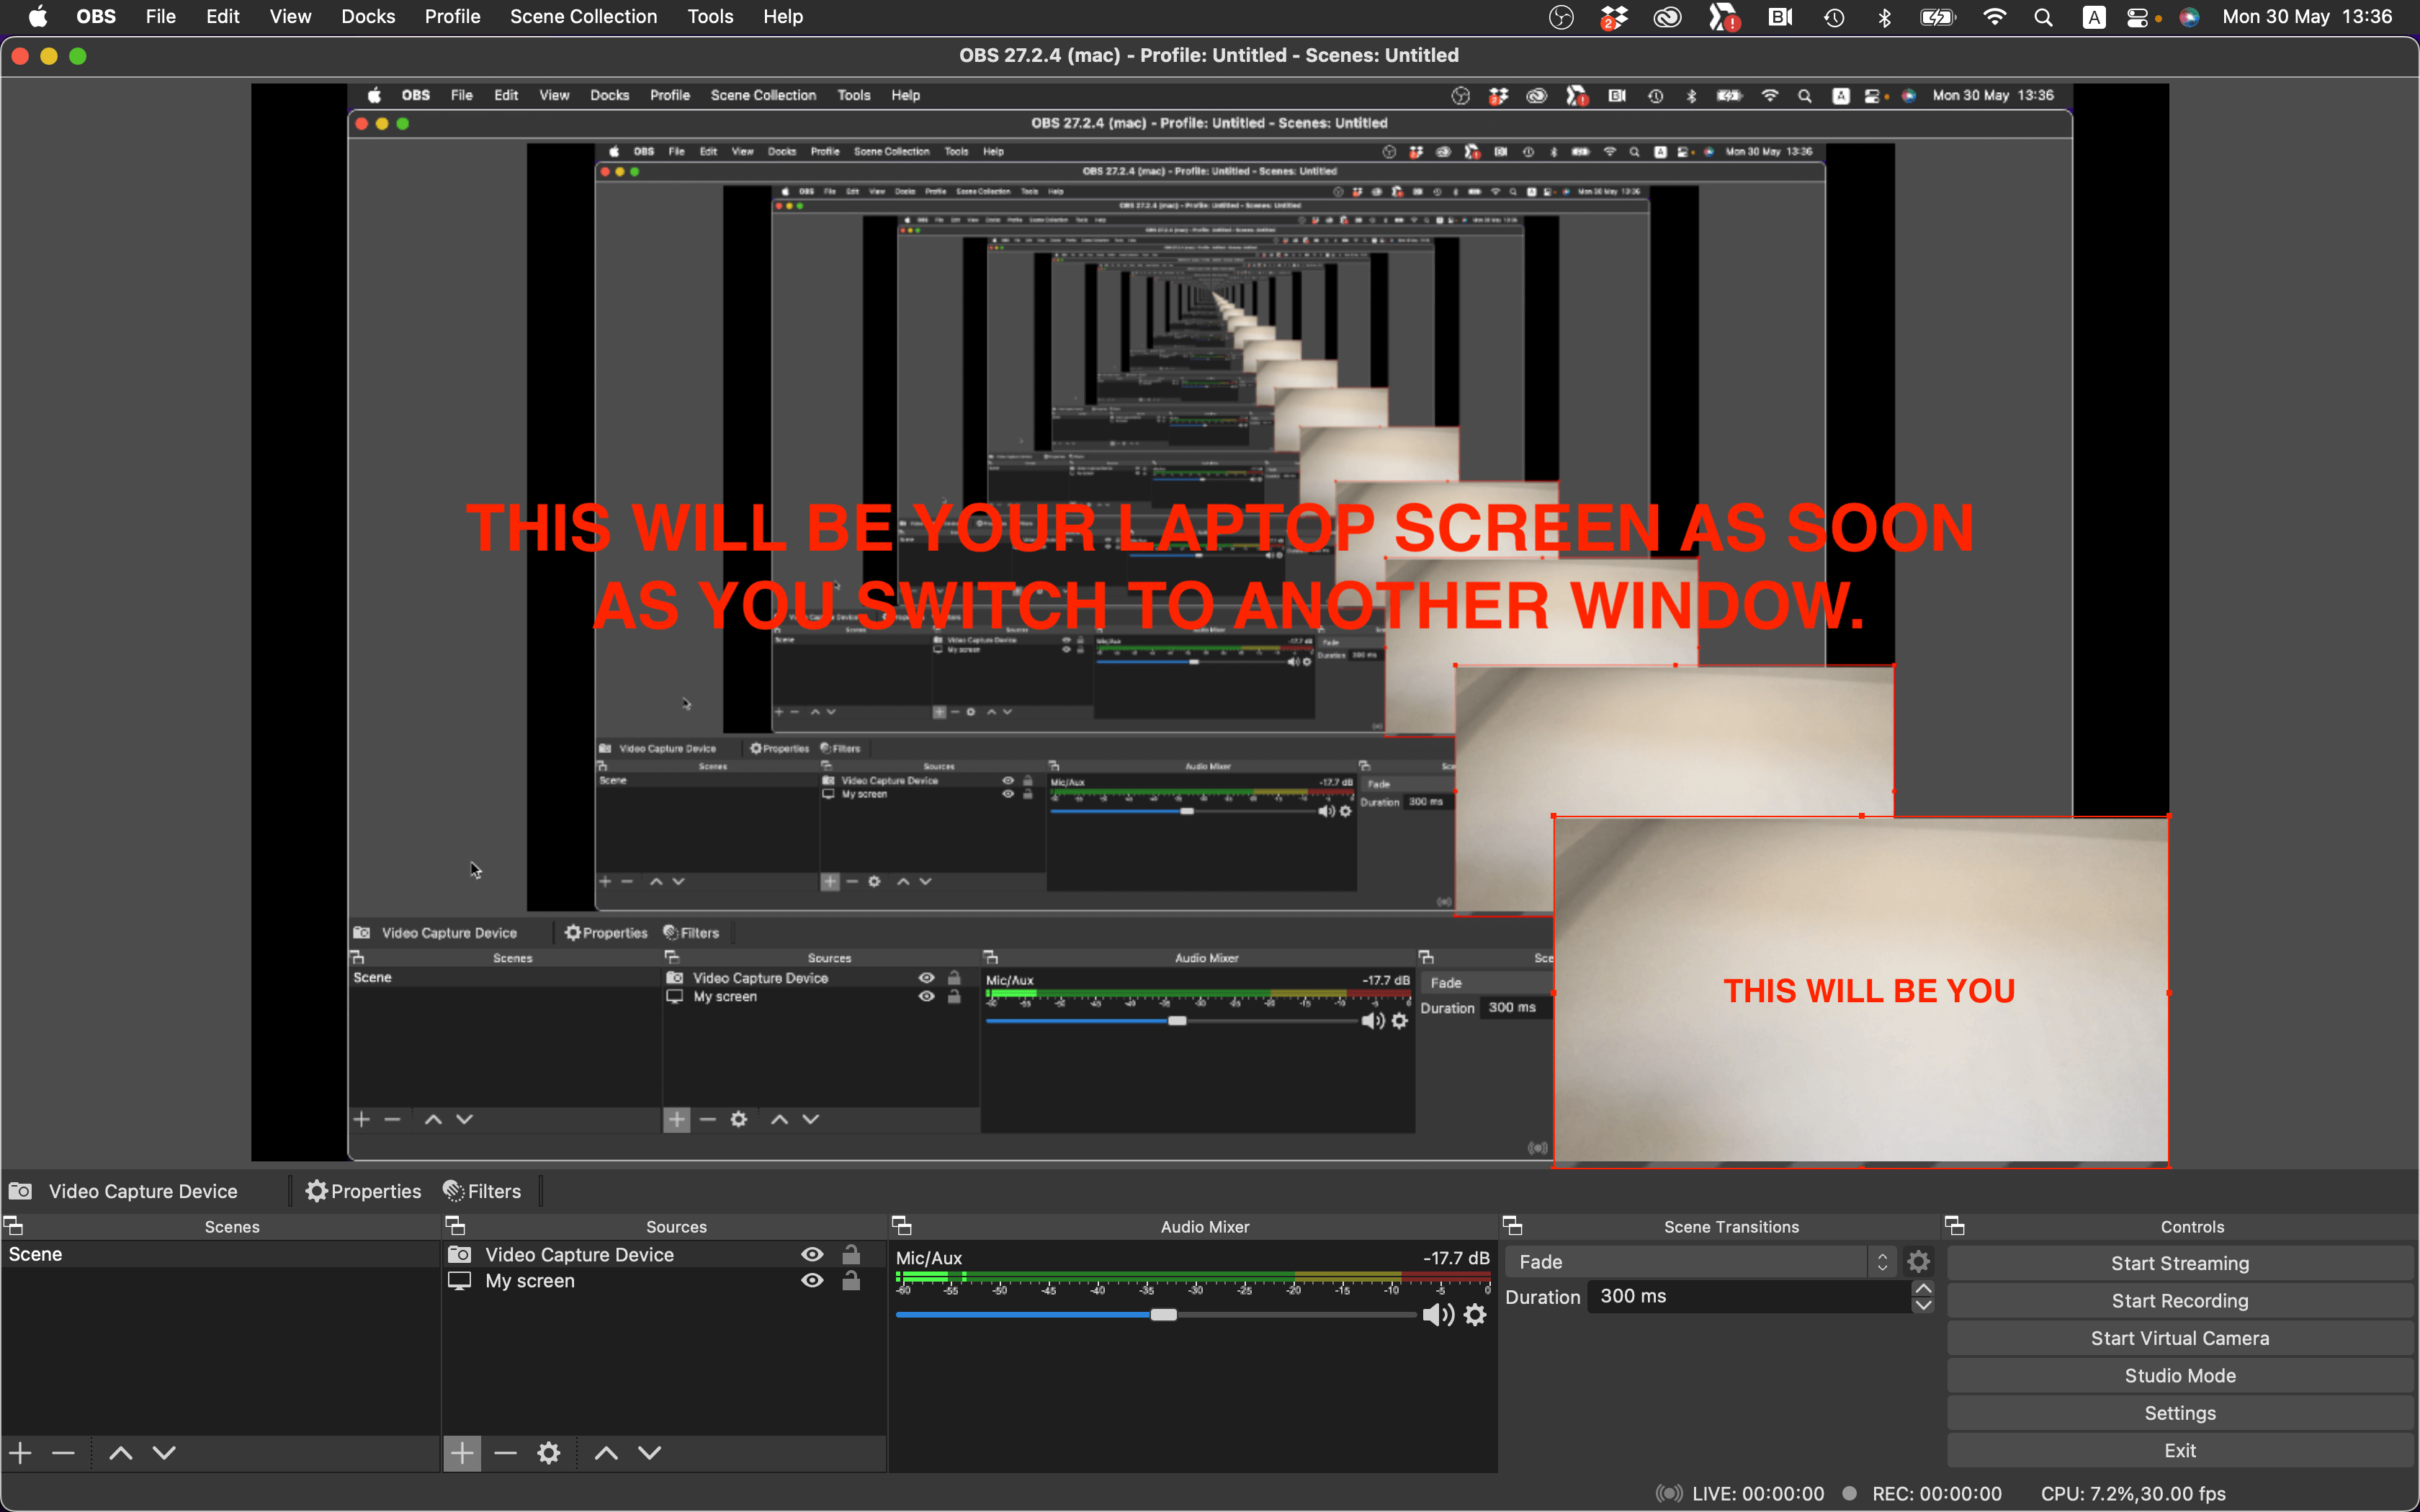
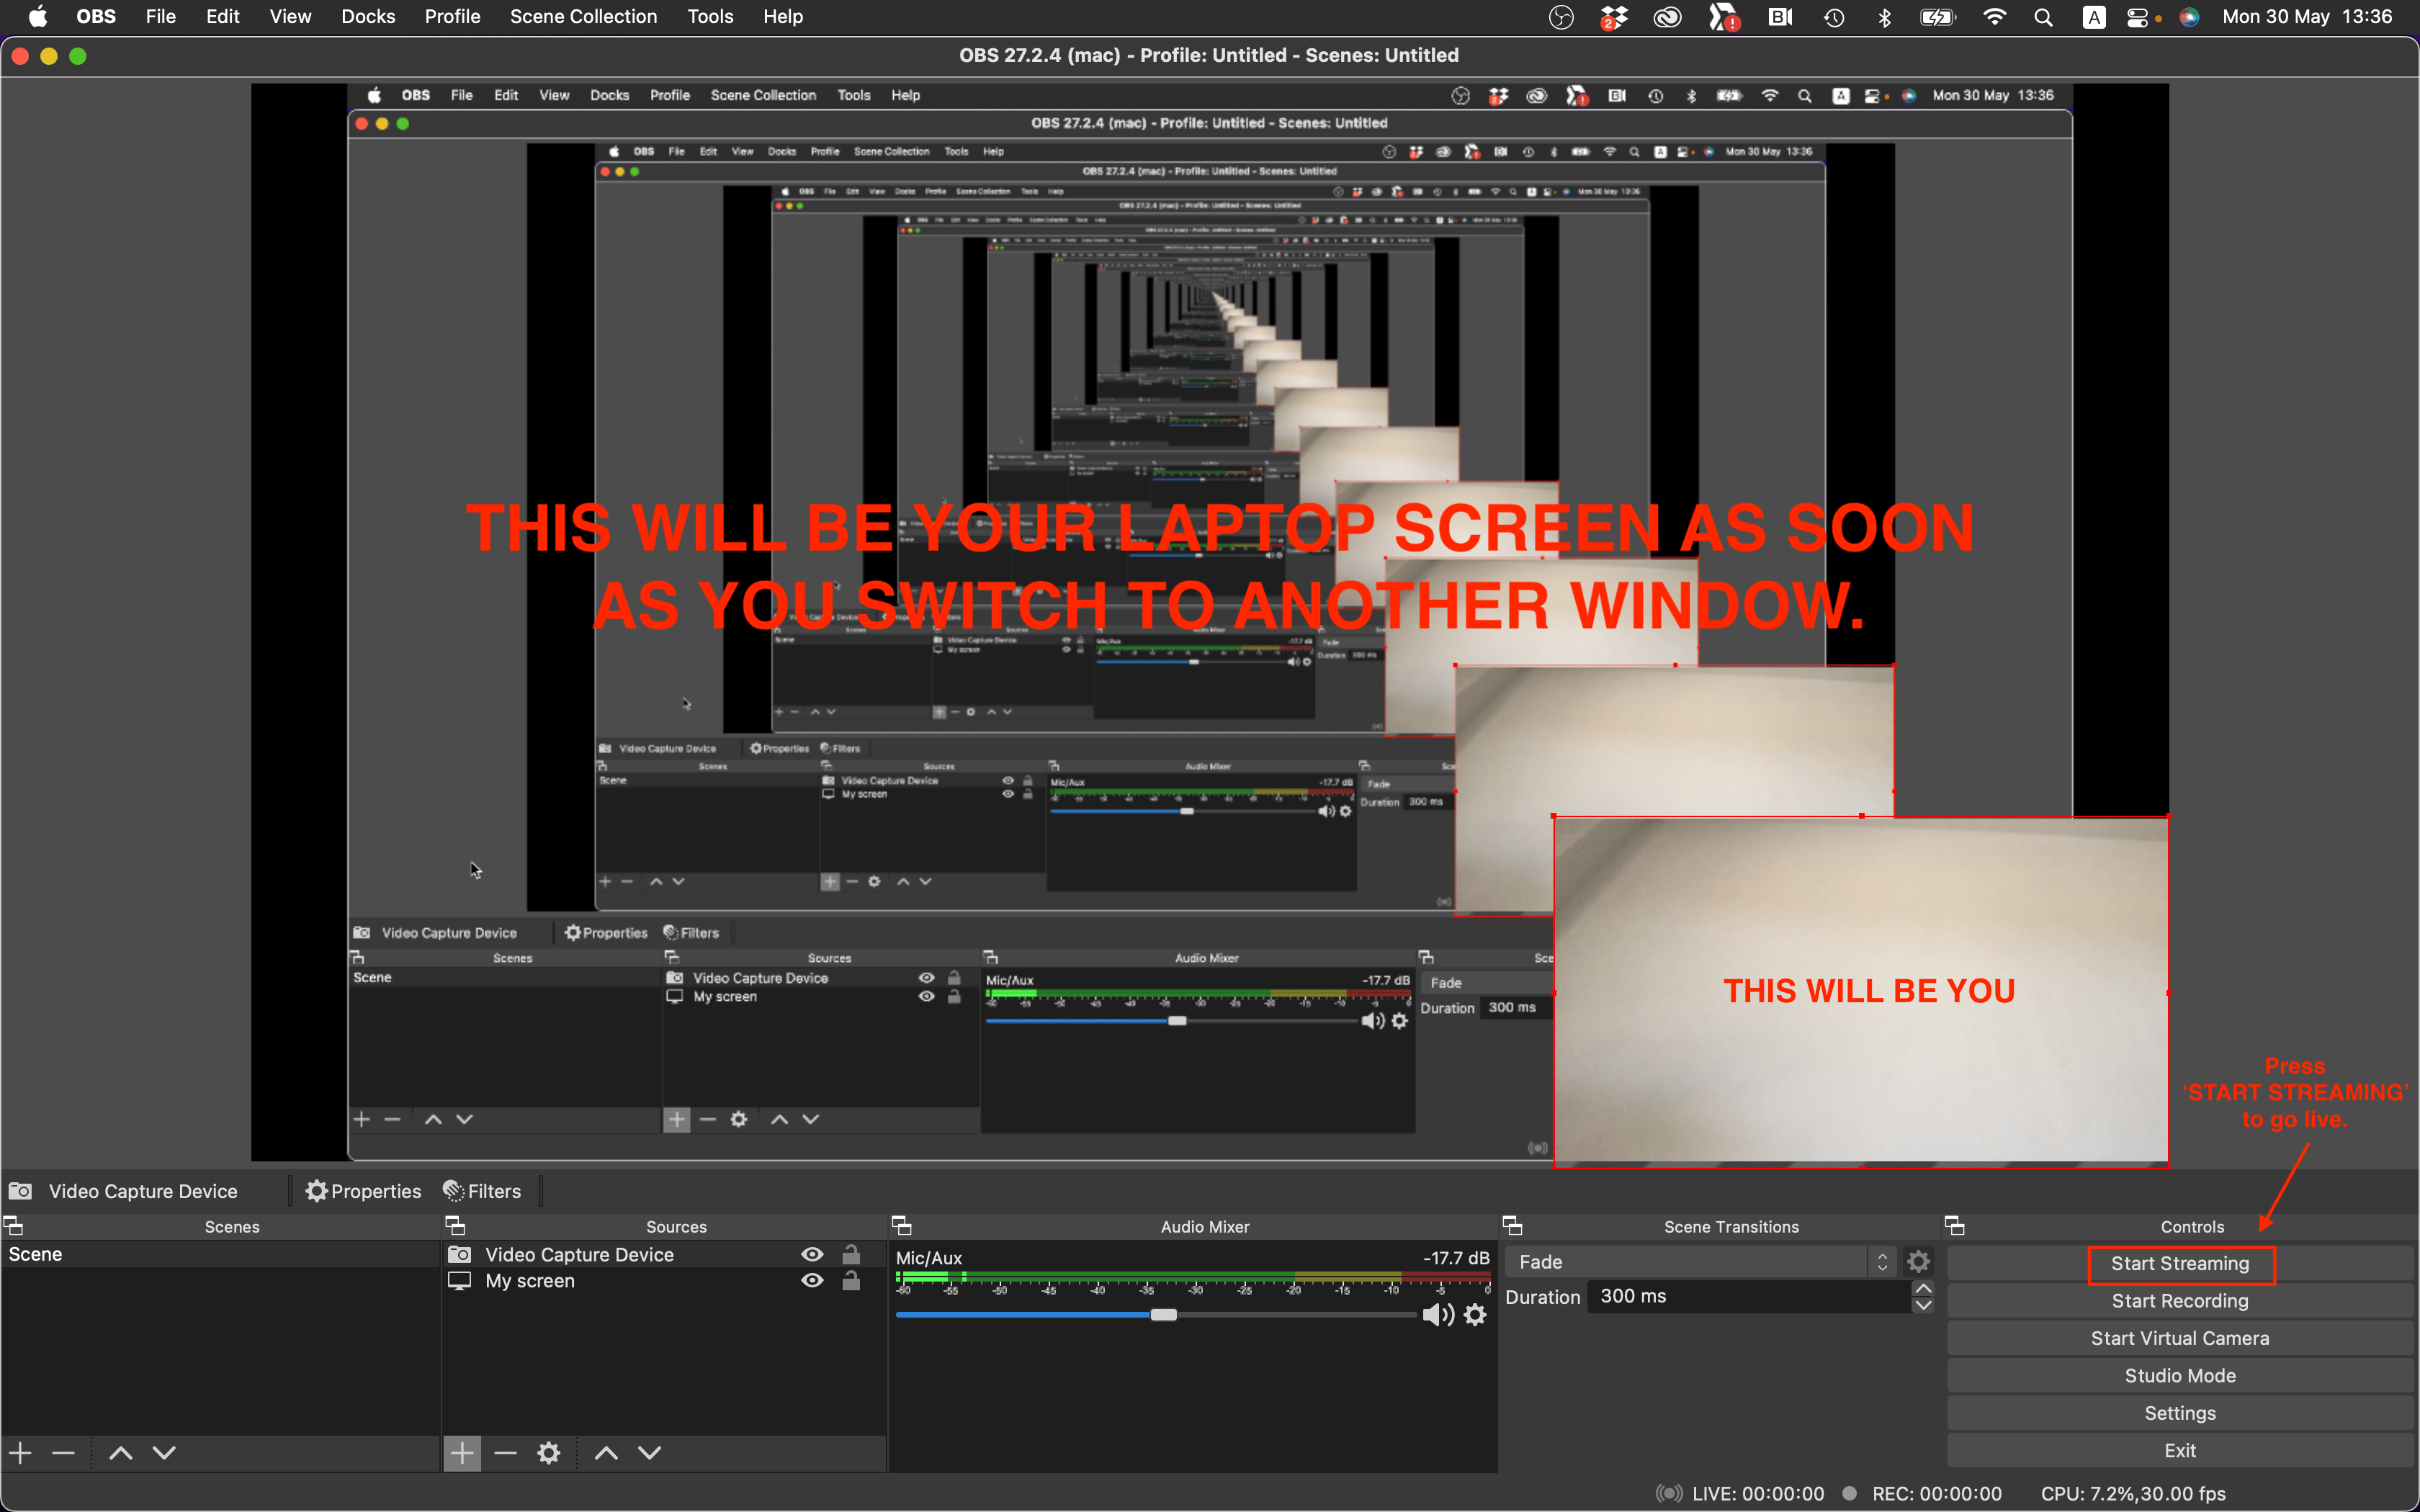
10. YOUR SCREEN IS NOW READY FOR THE LIVE STREAM
We know it looks trippy but as soon as you’ll switch from the OBS Studio to your presentation people will only see your screen and you in the bottom right corner.
11. SET UP YOUR AUDIO DEVICES By default, OBS Studio is set to capture your computer’s default microphone input.
- You can verify this by looking at the volume meters (1) in the mixer section of the main OBS Studio window.
- If they aren’t moving, or you suspect the wrong device is being captured, click on Settings circle (2) select PROPERTIES > DEVICE and select the devices manually in a drop-down menu.
- If there is more than one audio device shown in the audio mixer section, make sure they are muted / the volume is turned off.

12. WELL DONE! You are now ready to go live. See the next section for going live on VIMEO.
ON THE DAY OF YOUR LIVE WORKSHOP
GO THROUGH THESE STEPS EVERY TIME BEFORE YOU GO LIVE
1. OPEN ‘OBS STUDIO’ PROGRAM
-
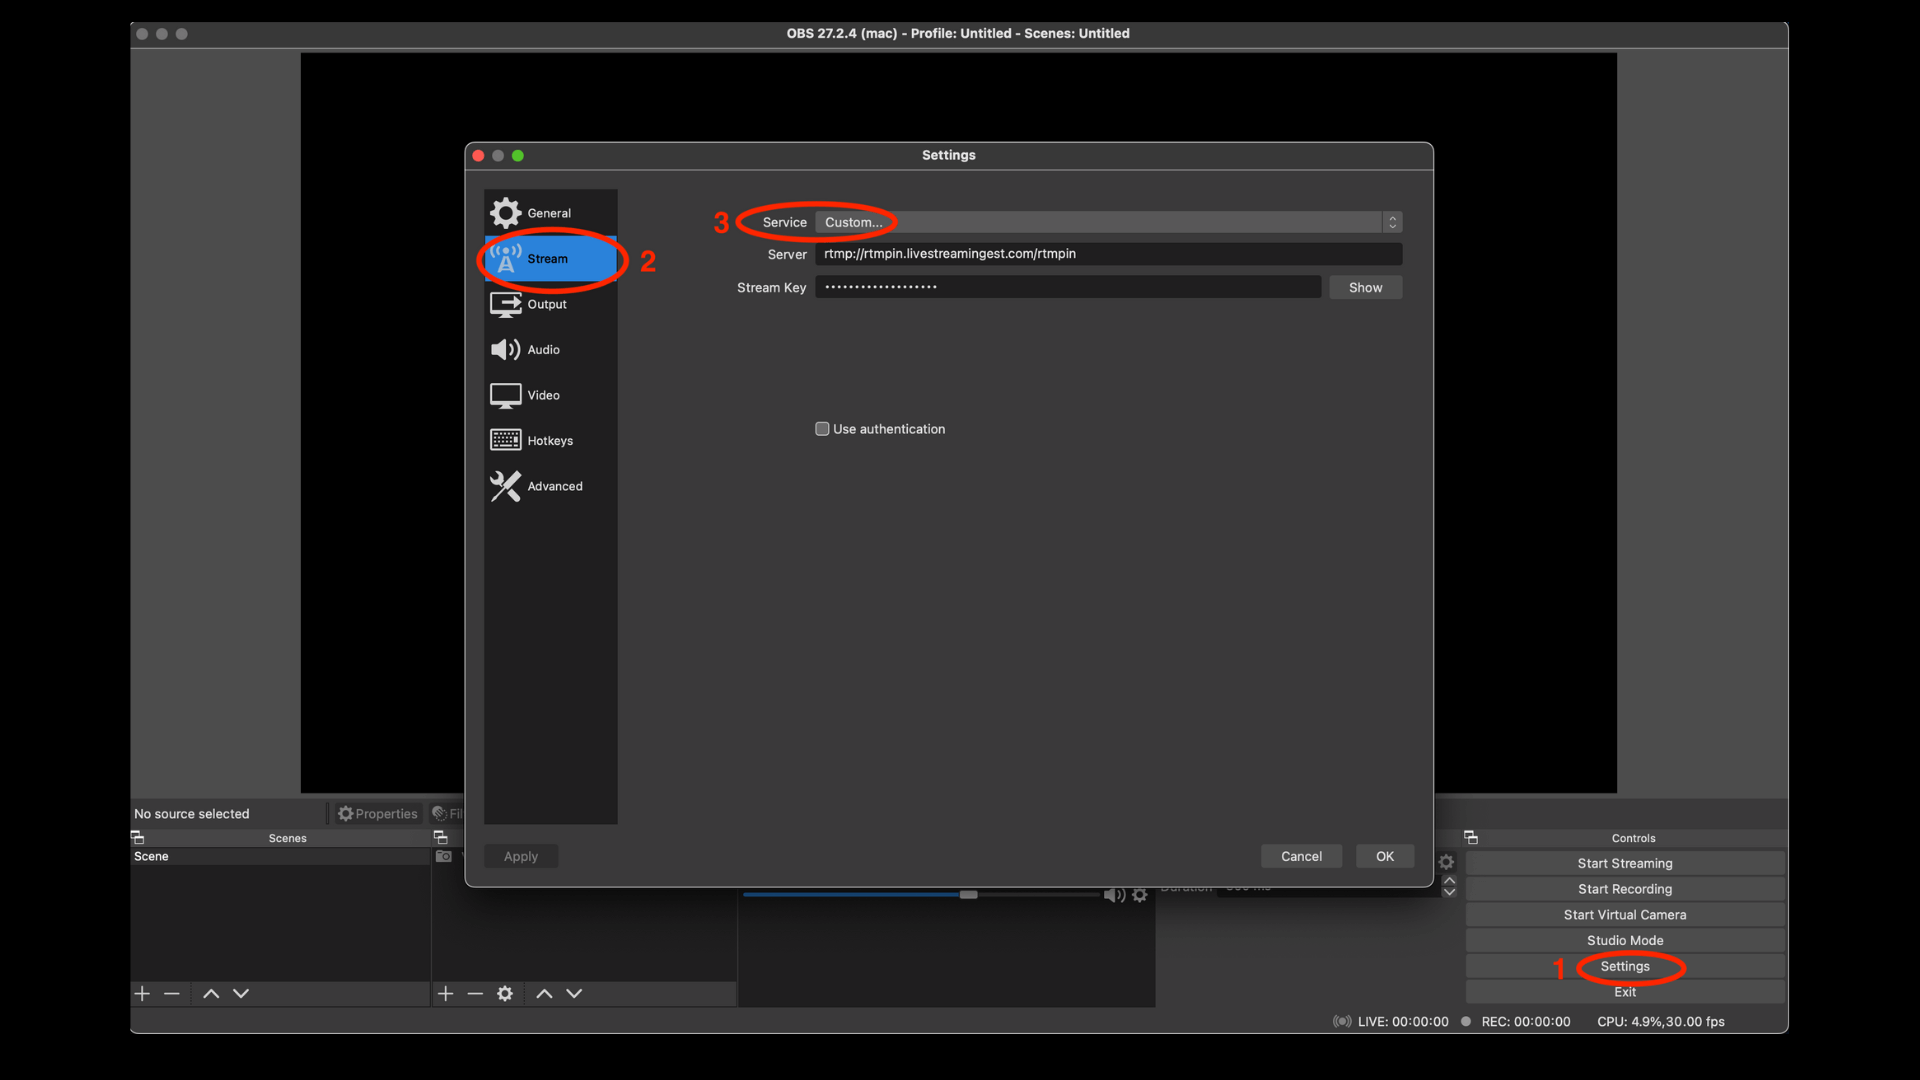
- Press Settings.
- Press Stream.
- Choose Service > Custom.
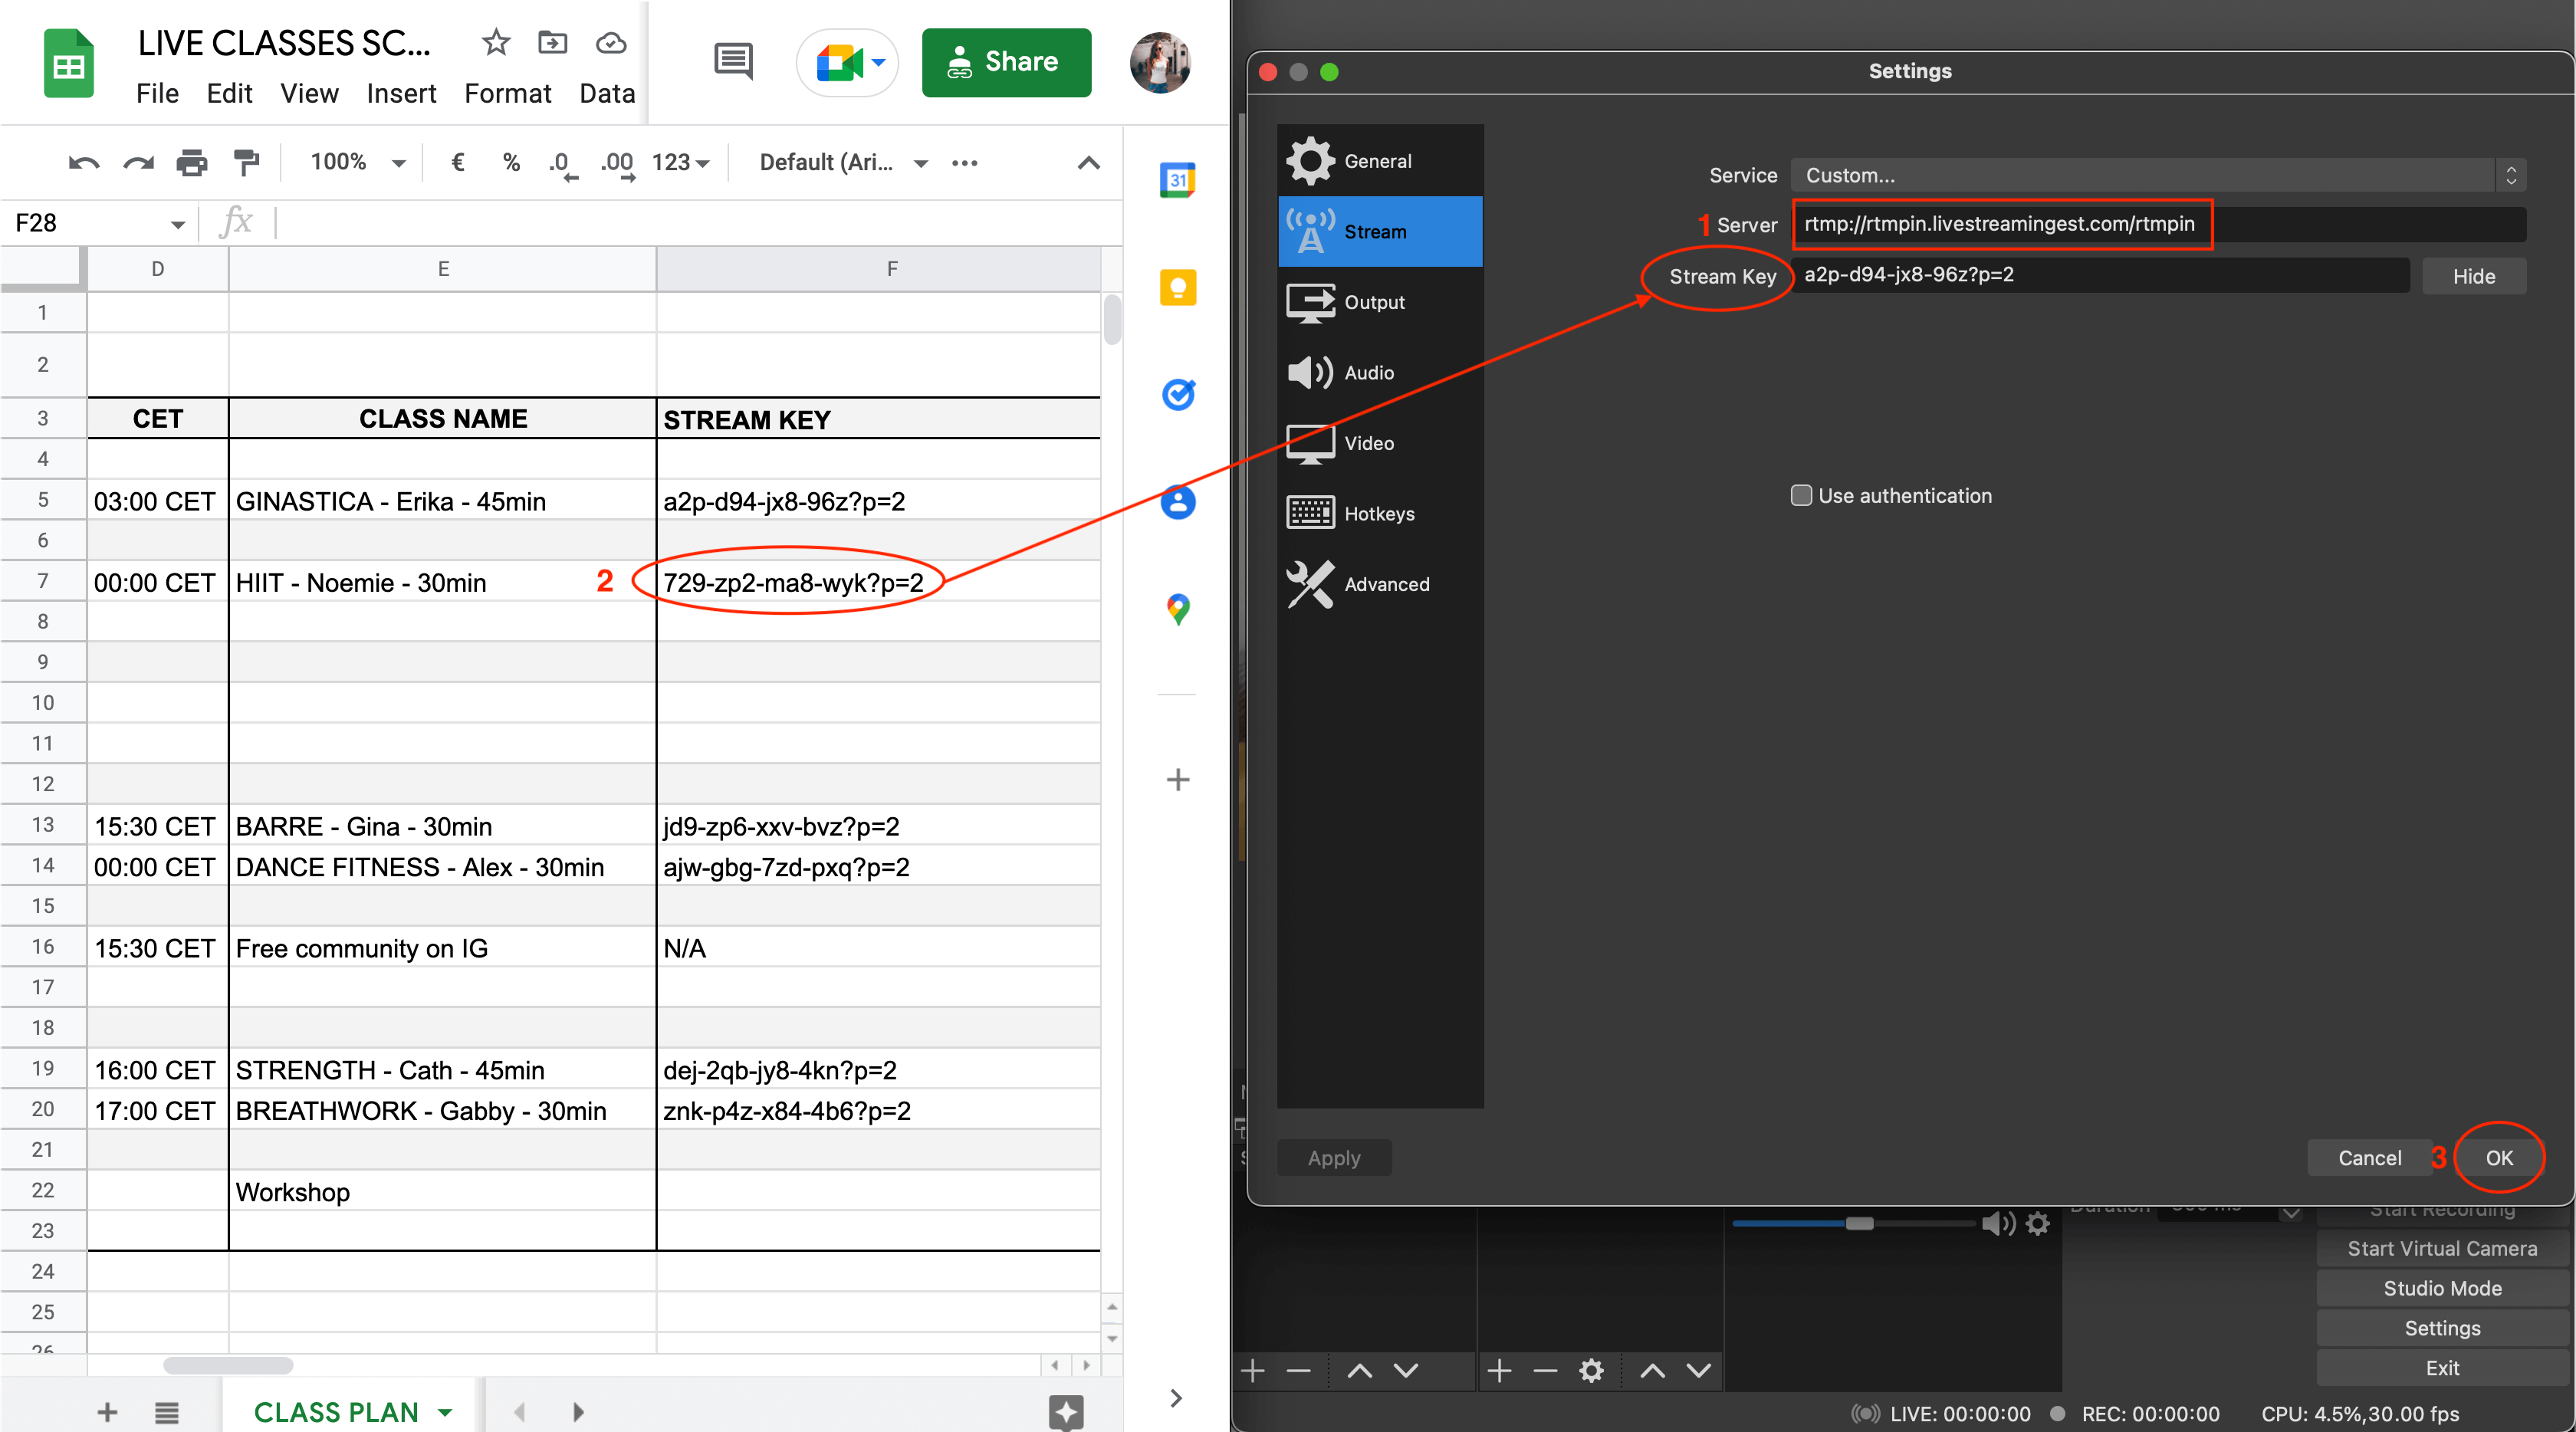
2. GO TO LIVE CLASSES SCHEDULE DOCUMENT > WORKSHOPS TAB
Click here to open the document
Have both the OBS Studio and Live Classes Schedule (Workshops tab) document open on your laptop.
-
- Copy rtmp://rtmpin.livestreamingest.com/rtmpin and paste it into the OBS Studio Server URL section. Make sure there is no space before and after the link. This link will be entered only once and the OBS will automatically save the livestream settings for your next class. However, before starting the live class double-check if the Server URL is correct.
- Copy-paste the Stream Key from the doc to OBS Stream Key. Make sure you copy YOUR PERSONAL STREAM KEY where your name is written next to it.
- Press Okay.
3. WELL DONE! NOW YOU’RE READY TO GO LIVE
All you need to do is to go to OBS Studio and press the ‘START STREAMING’ button at the time of your live class. This will immediately start the livestream and you cannot undo this. After you press the ‘START STREAMING’ button we suggest you to switch to your presentation window so you don’t get confused with so the trippy screen.
4. HOW TO INDICATE THAT YOU’RE LIVE?
After you press the ‘START STREAMING’ button, at the bottom right corner of the OBS Studio program you’ll see the live timer on and the green bar indicating that your stream is good and stable.

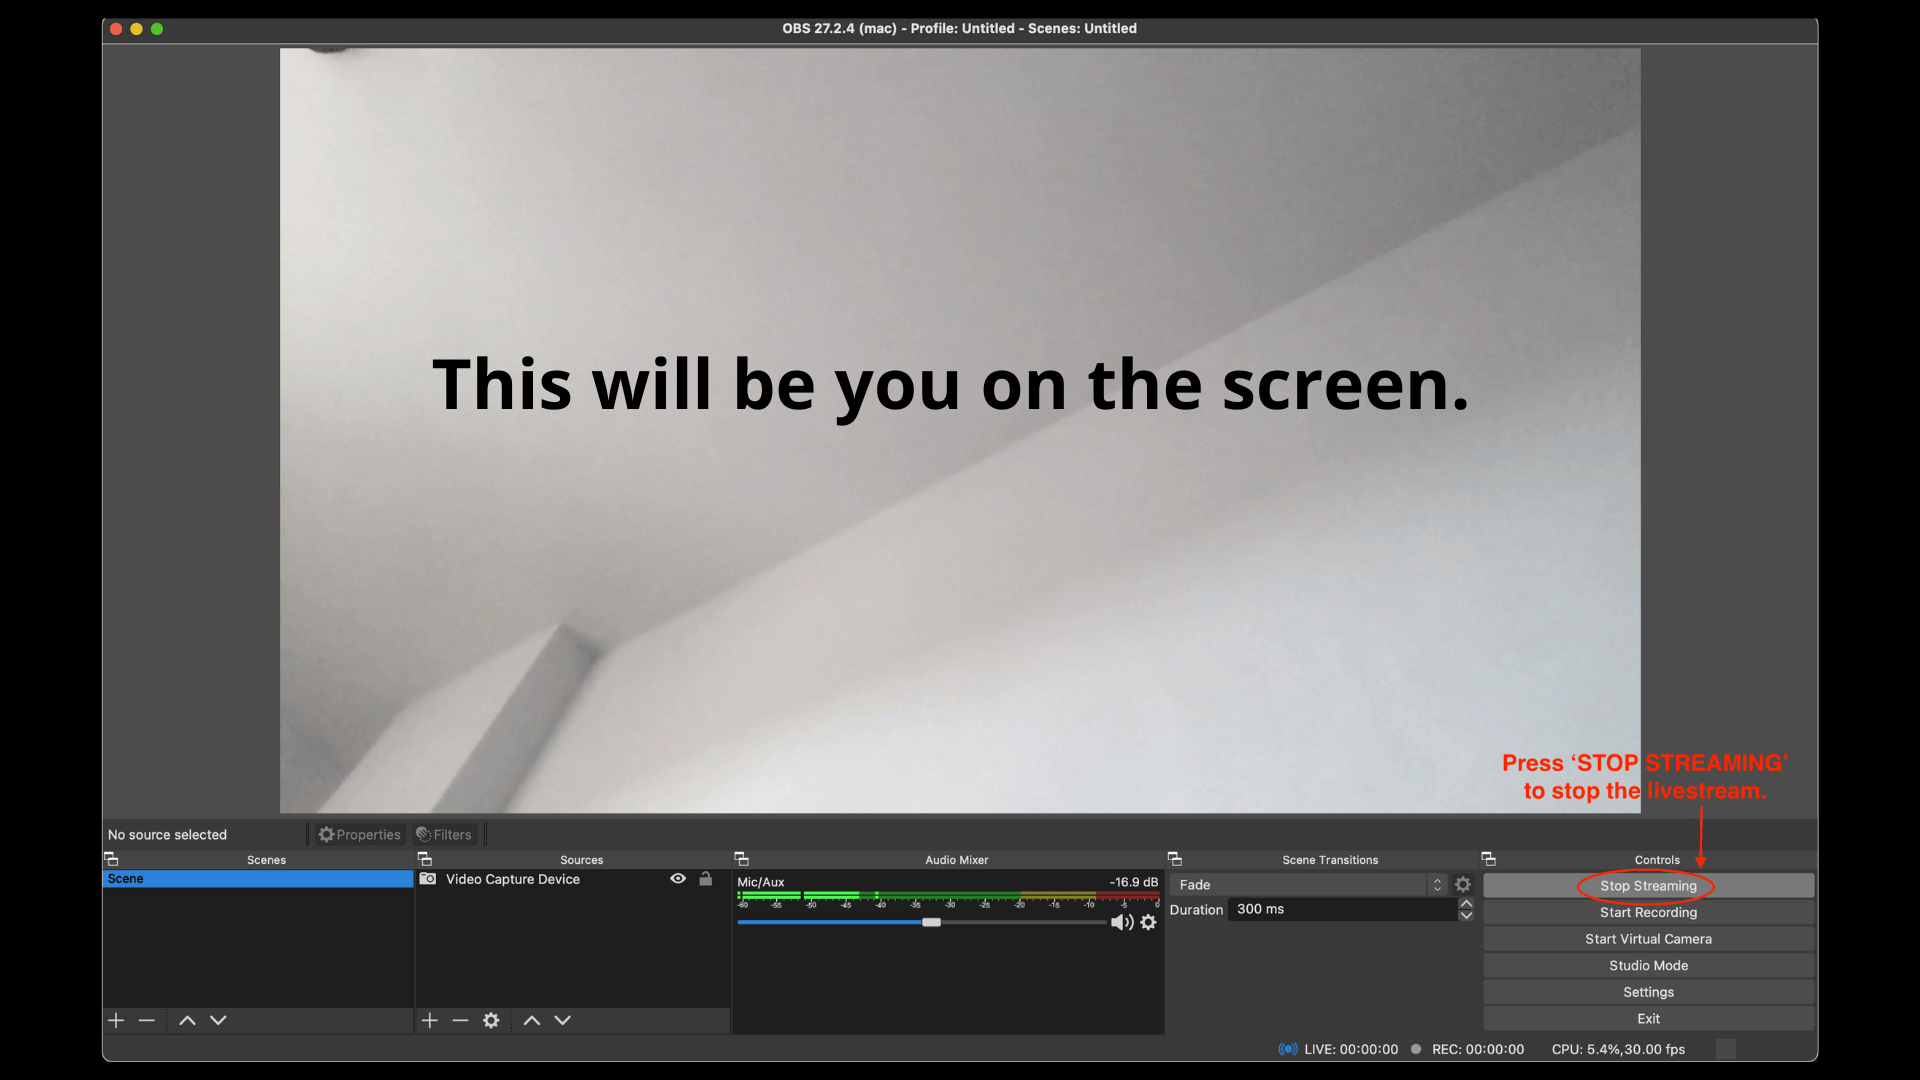
5. END THE LIVESTREAM
When you finished your class, come to your computer and in the OBS window press STOP STREAMING. This will immediately cut the stream and you’ll be offline. Well done you’ve just completed your first live class!
FAQ
DOES THE STREAM KEY EVER CHANGE?
Yes, the stream key changes every week. Basically, the stream key is directly linked to your video and cannot be overwritten. Therefore, every time you want to go live you need to enter a new stream key provided by us.
WHERE CAN I FIND A NEW STREAMKEY
New stream key will be added to this document every week and should be posted in the OBS Studio SETTINGS > STREAM > STREAM KEY.
HOW DO I KNOW THAT I’M LIVE?
After you press the ‘START STREAMING’ button, at the bottom right corner of the OBS Studio program you’ll see the live timer on and the green bar indicating that your stream is good and stable. If you see other colors like yellow and red it means that your wifi connection is not stable and you should connect to 4G.
WHAT DIFFERENT SQUARE COLORS MEAN?
RED COLOR – means that the video is frozen and only audio is being transmitted.
YELLOW COLOR – means that your video is glitchy and poor quality.
GREEN COLOR – means that you have a stable and good connection, video quality is good. If it’s switching between yellow and green it means that you have an average connection but in case it’s red and yellow you should immediately connect your laptop to 4G to have a good livestream.
CAN I PLAY MUSIC FROM MY LAPTOP?
Yes, and no. If you need to play music for your class we recommend you to have an external speaker connected to your phone or other computer (not your laptop that is connected to OBS). Also, make sure you regulate music volume a bit down than your voice so the music is not louder than your voice.
HOW TO CONNECT MY AIRPODS TO THE OBS?
- Take out your AirPods and connect them to your laptop first.
- Make sure you turn off all Bluetooth devices that you previously had your AirPods connected to (eg phone).
- Open the OBS Studio, click on the small settings Circle in the Audio Mixer section, Select Properties and then from a dropdown menu choose AirPods. Click ok.
- When you connect AirPods to your laptop and connect to OBS Studio in the Audio Mixer make sure you only connect to the MIC/AUX on and turn off / MUTE any other audio sources and ONLY KEEP MIC/AUX ON.
HOW TO TEST IF YOUR AIRPODS ARE WORKING?
- Put on your AirPods and move 10 meters away from your laptop and talk.
- The best is that someone is next to your laptop and checks if the sound bar is moving. Or if you don’t have anyone take your phone, open your camera and zoom in while you’re standing far away to see if the sound bar is moving when you’re whispering.
I’M RUNNING LATE TO MY CLASS. WHAT SHALL I DO?
Don’t worry. You can be a few minutes late as your live class will only start after you press ‘START STREAMING’ button. We prefer you to be in a good space, with a clean environment and stable internet connection.
MY OBS SAYS ‘ENCODING OVERLOADED’. WHAT DOES IT MEAN?
It means that your computer can’t encode your video fast enough to maintain the settings you have it set to, which will cause video to freeze after a few seconds, or periodic stuttering. One way to fix that is by downscaling your output resolution.
You can change how much you want to downscale in Settings > Video > Output (Scaled) Resolution. You can keep your Base (Canvas) Resolution the same, so that your layout doesn’t change, and then downscale the resolution from 1280×720 to lower.
MY COMPUTER IS REALLY LAGGING WHEN I OPEN THE OBS. WHAT SHALL I DO?
The most important thing before going live is to close all open windows and apps on your laptop to ensure that your computer is not lagging and is able to stream.